2kiters Arno Haft's Manual de usuario

Arno Haft's Vogeldrachen
(Bird Kite)
©Bob and Charmayne Umbowers
3 March 2007
www.2kiters.com

The Arno Haft Bird Kite
Arno Haft's bird kite is from the 1950's. The original kite was made from cotton canvas and
wood spars. Herr Haft lived in Hamburg Germany. He flew many of the classic kites such as the
Rolo Plan. One of his specialties was line climbers used for aerial photography. Your bird will be
made from our modern-day materials of ripstop nylon and composite rods. Fly your kite in
moderate wind with 80 to 100 pound test line.
Please note: Metric measurements have generally been used in this manual. In some cases the English
measurements are used when that is how the item is supplied in the USA.
Supply list:
2 yards of 60 inches wide 3/4 ounce ripstop nylon (2.5 yards of 54 inch wide or 2 yards cut
on the cross grain). Metric requirements: 1.8-2.3 meters
Small amount of black white and yellow ripstop nylon for eyes and beak (optional)
60 cm of 3 inch wide 3.9 ounce Dacron for reinforcements
60 cm of 1 inch wide black 3/4 ounce ripstop edge binding split in half lengthwise
9.5 meters of 1 inch wide black 3/4 ripstop edge binding
10 meters of 80 pound test line. It will be cut into the following lengths see instructions:
spine line and loop (30 cm and 6.5 cm respectively.)
2 wing tip lines (60 cm total. Divide in half.)
2 lower wing loops (122 cm total. Divide in half.)
4 tiny upper wing and head loops (26 cm. Divide in fourths.)
2 small tail loops (13 cm total. Divide in half.)
rigging lines between tail / wing and between spine / outer tail tips (2 meters total. Do not
divide until reading instructions.)
bridle (5.5 meters or remainder of 80# test line.)
112 cm of 30 pound test line. It will be cut into the following lengths see instructions:
Line for rigging between head and wing (1 meter total. Divide in half.)
Line for cheater line on one tail loop. (12 cm.)
2 Dihedrals (4" and 2.5" of aluminum tubing formed to a 150 degree angle.)
(3) small solid aluminum rings (1/4 inch)
(2) hooks size 3
(3) Graphite .2200 / 5.6 mm x 48" rods plus 27 cm of a 4th rod. Purchase (4) rods total.
(4) Stubby Nock - .2200"
(1) Aluminum ferrel # 2200
(1) Graphite .1800 / 4.6 mm x 29.5" rod
(2) Stubby Nock - .1960"
Other materials: high quality black thread thread matching the bird's color thin Super Glue
narrow double sided tape Scotch tape beeswax black permanent pen such as a Sharpie pencil
or chalk pencil.
Note: Please read instructions carefully paying close attention to indicated front and bac .

3
Cutting and mar ing:
60 inch wide fabric:
Fold fabric in half with cut edges together
and the selveges even. Position wing
template close to the cut edges end NOT
THE FOLD. Cut the wings. Refold
remaining fabric lengthwise. Position
body template on the fold. Cut one body
piece on the fold.
54 inch wide fabric: cut on the cross grain. Cut
body on the fold and wings separately.
Mark wings: mark the spreader rod line
and the position for the line and
reinforcement on the lower wing edge.
Mark body: Mark the spreader rod line at
the spine. Mark position for optional eyes
and beak.
Cut 2 strips for the wing spreader sleeves:
each 96.5 cm x 4.5 cm. Cut 1 spine sleeve: 133 cm x 4.5 cm. 1 tail spreader sleeve: 8 cm x 2.8
cm. English: 2 wing spreader sleeves each 38 inches long x 1 3/4 inches wide each. 1 spine
sleeve: 52 1/4 inches long x 1 3/4 inches wide. Cut 1 strip of lack ripstop for the tail spreader
rod sleeve: 3 inches long x 1 1/8" wide.
Cut then heat seal all reinforcements from 3.9 ounce Dacron. See reinforcement diagram. Fine
tune as necessary before sewing in place.
Sewing procedures:
Optional Appliqué Appliqué the black pupils onto the white eye pieces. Do not back cut.
Scotch tape in place on the body. Use black thread and zig zag stitch the outer edge of the eye
onto the body. Trim excess black fabric. Back cut leaving the white under the pupil. Appliqué
the beak using white to back the yellow fabric. I do not
back cut the beak unless necessary. This is a stress
point on the kite and back cutting will weaken this area.
Black may also be used for the beak color. Set aside.

4
Reinforcements Use matching thread.
Sew the reinforcements onto the back of
the kite skin. Use a Zig zag stitch. Look
at the samples pictures and Diagram1
for correct placement and the side to
sew. Reinforcements C and E will be
sewn in place after the wings and body
are sewn together.
Part 1. (of 4 Parts) Wings: Sew A B
and I onto the wings. Make a right and a
left wing. Sew H on the wings. The
center of H is 10.5 inches / 26.6cm from
the inner edge. Straight stitch the outer edge. It will be covered with the edge binding and the top
edge will be sewn as you edge bind. It is helpful later if you position a piece of tape with a mark
on it pointing to the center of H.
Note: Sewing all
edges is not necessary.
Reinforcements A B I and H Reinforcements J and K

5
Part 2. Body: Position and sew on G F J K. These use the same methods as for the wing.
Part 3. Reinforcement D: This is the 3" x
5/8" or 7.75 x 15 cm piece of Dacron.
Center it on the back of the body where
the spine and spreader cross. Don't sew it.
Tape it in place. Place the dihedral strap
(1/4" x 3.5" or .6 x 9 cm) so that it is
centered horizontally on the taped D
piece. The ends are even top and bottom
forming a loop in the center. Sew with a
straight stitch across the ends and where
the loop starts. Zig zag on the strap. See
drawing. Later when you are putting the
spine sleeve in place you will catch the
outer edges of piece D. (Note: The
dihedral will slide into the strap but will
not stay in place.) Diagram 8 on page 10
shows the strap's location. Reinforcement D

6
Edge binding part 1 of 2 parts: Body: Fold the edge binding
in half position body inside the binding at the fold. Use a
narrow zig zag stitch with black thread. Stitch close to the
edge. Edge bind the head and the tail as shown in diagram 2
and the photo below.
(Head) Spine loop 80# test line. Position the 6.5 cm spine loop on
top of the reinforcement on the FRONT of the kite. Stitch in place
securely. See Diagram 3. (1)
(Tail) Spine line 80# test line. Position the 30 cm spine line on top of the reinforcement on the
BACK of the kite. Stitch in place securely. See Diagram 8 on page 10 (A)
7
Construct the ing spreader and spine sleeves This sleeving method is quite different from
most methods used today. It is the method Herr Haft used. Start by folding the ends to the right
side and sewing in place. Then fold all three sleeves in half lengthwise wrong sides together. Do
not make a hard crease. Straight stitch 14 mm (scant 5/8" inch) from the fold. I suggest you pin
the sleeves before sewing to keep the fabric from creeping lengthwise. Make all three sleeves.
Set aside the 2 shorter (wing spreader) sleeves.
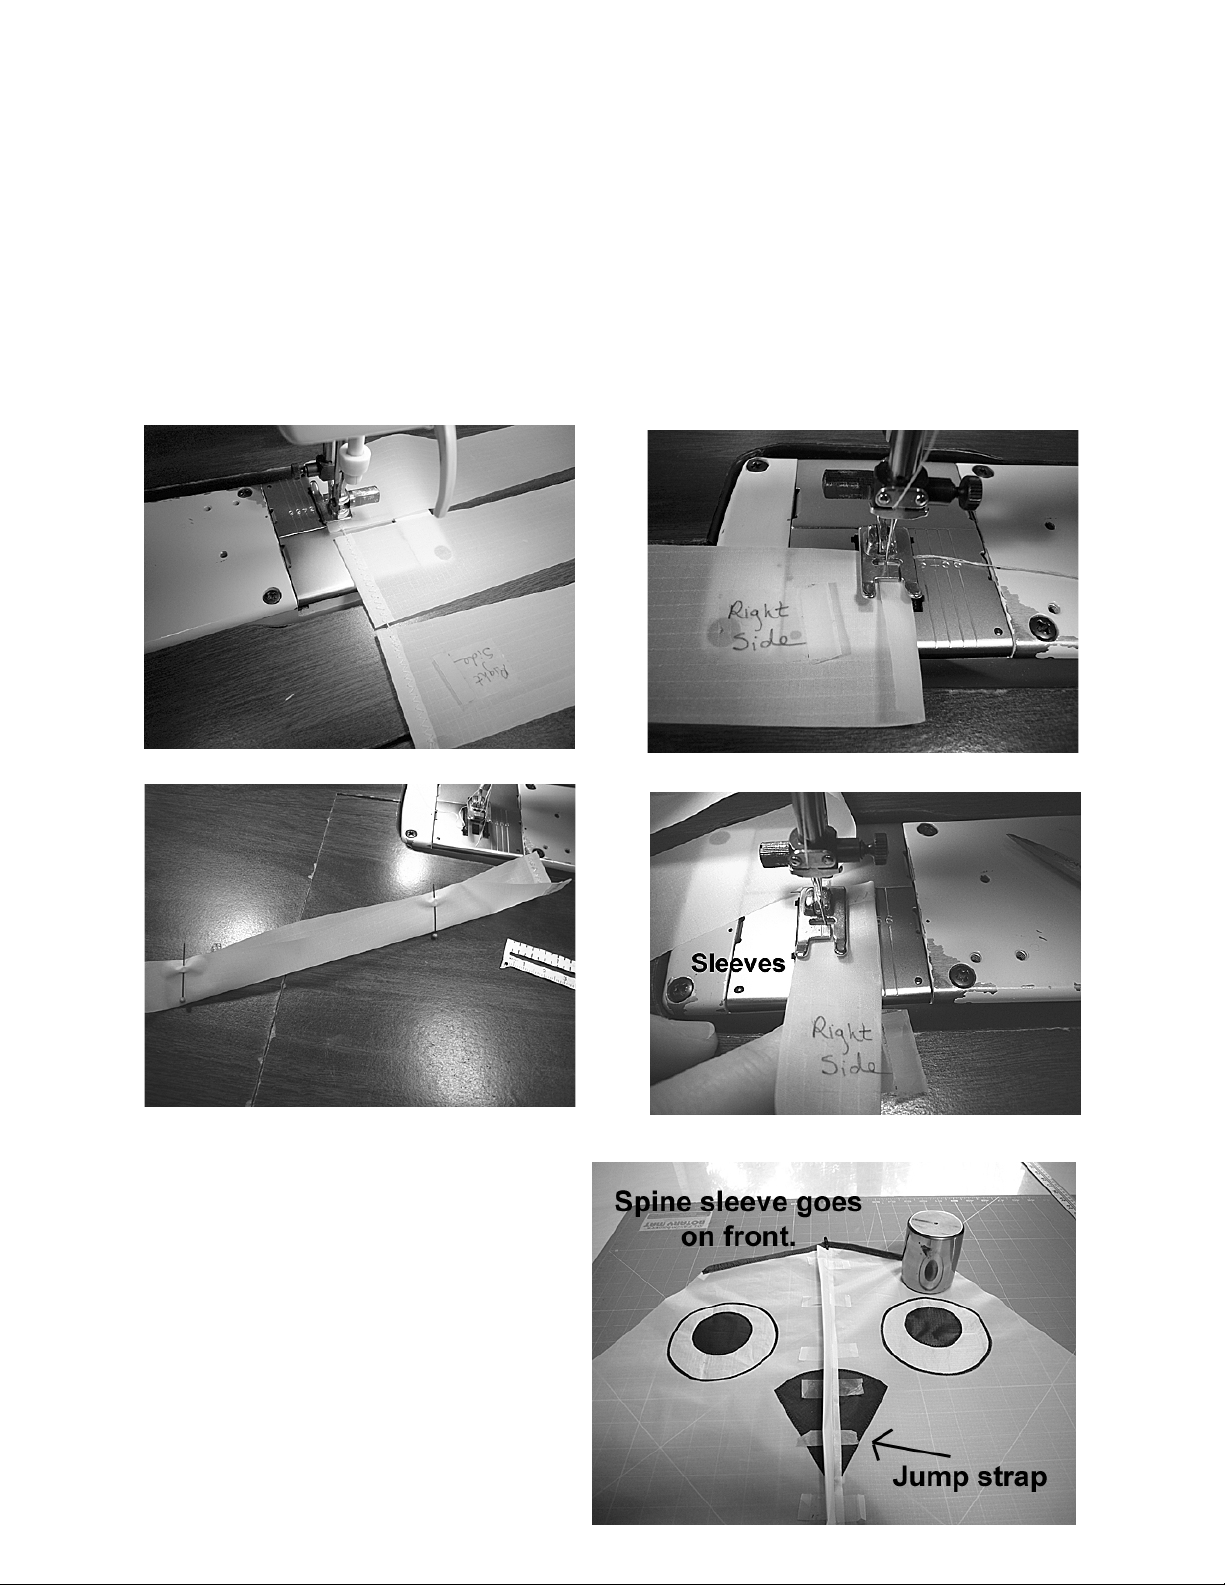
Attach spine sleeve to the body Fold the
body in half and crease. On the right side of
the body draw a pencil line at intervals on the
crease to make sleeve placement easier. Also
mark the position of the dihedral loop which
is on the back. Open out the seam allowances
on the sleeve. Position the seam of the sleeve
on the pencil line. You are putting the spine
sleeve on the FRONT of the body. Use tape
tabs and secure the sleeve on each seam
allowance. Push the sleeve to one side and

8
zig zag close to the seam removing the tape tabs as you get to them. Jump over the loop
backstitching each side of the jump. The loop must remain free. Do not sew into the sleeve stay
on the allowance. Repeat on the other side. The following pictures may help you. You may also
straight stitch close to the seam of the sleeve and then zig zag close to the sleeve edge. This is the
neatest and most secure method but involves more work.

9
Tail rod sleeve Sew the ends back to the right
side. Center the sleeve over the spine line on the
BACK of the bird. Zig zag lower edge. Make a
tunnel and sew other long edge being careful not
to catch the spine sleeve on the front. This sleeve
is tight; sew close to the edges.
Wings to body Using a 1 cm or 3/8" seam allowance sew the wings to the body as shown in
Diagram 6. Right sides together. You may use narrow double sided tape inside the seam
allowance as this seam will be top stitched in place. Straight stitch. Finger press seams towards
the wings.
Reinforcements part 4: Position
and sew on reinforcements C and E
onto the back of the kite. Diagram 6.

10
Decorative detailing wing/body detail:
Using the narrow 1/2" edge binding position
it on top of the seam between the body and
the wing. It will follow the line from the
edge of the wing down to the tail dividing
the wing from the tail. See diagram 7. It
goes from reinforcement C to reinforcement
E. Stitch both sides.
Edge binding part 2 Finish the rest of the edge binding so that the entire bird is outlined.
Spreader sleeves These go on the BACK of the kite. Follow the method for the spine. Center
the sleeve between the wing tip and the spine. The sleeve does not span the entire distance.
Diagram 8 shows their position.
Tabla de contenidos


